Shallots (Allium cepa var. aggregatum) are often treated as the refined, sophisticated cousin of the common onion. In the culinary world, they are prized for their nuanced flavor—a delicate balance of sharp acidity and mellow sweetness with a hint of garlic. For the gardener, however, shallots represent one of the most rewarding “set-and-forget” crops, particularly when planted in the autumn.
Planting shallots in the autumn, a practice known as overwintering, allows the bulbs to establish a robust root system before the ground freezes. This head start leads to earlier harvests and often larger, more resilient clusters compared to spring-planted counterparts.
1. Understanding the Shallot: Botany and Biology
To grow shallots successfully, one must understand their unique growth habit. Unlike onions, which typically grow as a single bulb from a seed or set, shallots are multiphase. When you plant a single shallot “set” (a small dormant bulb), it does not simply grow larger; it divides.
By the end of the season, that single bulb will have transformed into a cluster of five to fifteen individual shallots, all connected at the basal plate.
The Two Main Types
- Jersey (Pink) Shallots: These are the most common. They have a copper-colored skin and a rosy tint to the internal flesh. They are prolific and store exceptionally well.
- French Grey (Griselle) Shallots: Often considered the “true shallot” by chefs. They have a long, slender shape, greyish skin, and a potent, refined flavor. Note that Griselle shallots are almost exclusively grown from sets and do not produce seeds.
2. Why Plant in Autumn?
While shallots can be planted in early spring, autumn planting (typically between October and December, depending on your hardiness zone) offers several distinct advantages:
- Yield Volume: Overwintered shallots generally produce larger clusters because they have a longer total growing period.
- Root Establishment: The cool, moist soil of autumn encourages rapid root growth without forcing immediate top growth. This makes the plant much more drought-resistant when summer heat arrives.
- Early Harvest: Autumn-planted shallots are usually ready to lift 3–4 weeks earlier than spring-planted ones, freeing up garden space for “succession crops” like kale, carrots, or beans.
- Vernesalization: Many varieties require a period of cold (vernalization) to trigger the bulb-splitting process efficiently.
3. Selecting the Right Varieties for Autumn
Not all shallots are suited for the damp, cold conditions of a winter soil. You must select “overwintering” varieties specifically bred for bolt-resistance and cold hardiness.
| Variety | Shape | Flavor Profile | Key Characteristic |
| Jermor | Long/Banana | Sweet, mild | High resistance to bolting; a French favorite. |
| Longor | Long/Torpedo | Refined, copper skin | Excellent skin quality; easy to peel. |
| Griselle | Small/Pointed | Intense, earthy | The choice for gourmet cooking; plant in well-drained soil. |
| Yellow Moon | Round | Classic shallot bite | Excellent disease resistance and high yields. |
| Red Sun | Round/Large | Sharp but balanced | Very hardy; one of the best for winter storage. |
4. Site Selection and Soil Preparation
Shallots are relatively undemanding, but they have two non-negotiables: sunlight and drainage.
Sunlight
Shallots require full sun (at least 6–8 hours a day). Because they will be in the ground during the shortest days of the year, ensure they aren’t placed in the “winter shadow” of evergreen trees or buildings.
Soil Composition
Shallots prefer a loamy, friable soil with a pH between 6.0 and 7.0.
- Heavy Clay: If your soil is heavy clay, planting in the autumn can be risky as the bulbs may rot in cold, waterlogged ground. In this case, grow them in raised beds or incorporate significant amounts of grit and well-rotted organic matter to improve drainage.
- Nutrients: Shallots are moderate feeders. Avoid high-nitrogen fertilizers in the autumn, as this encourages lush, soft top growth that will be easily damaged by frost. Instead, focus on potassium and phosphorus to aid root development.
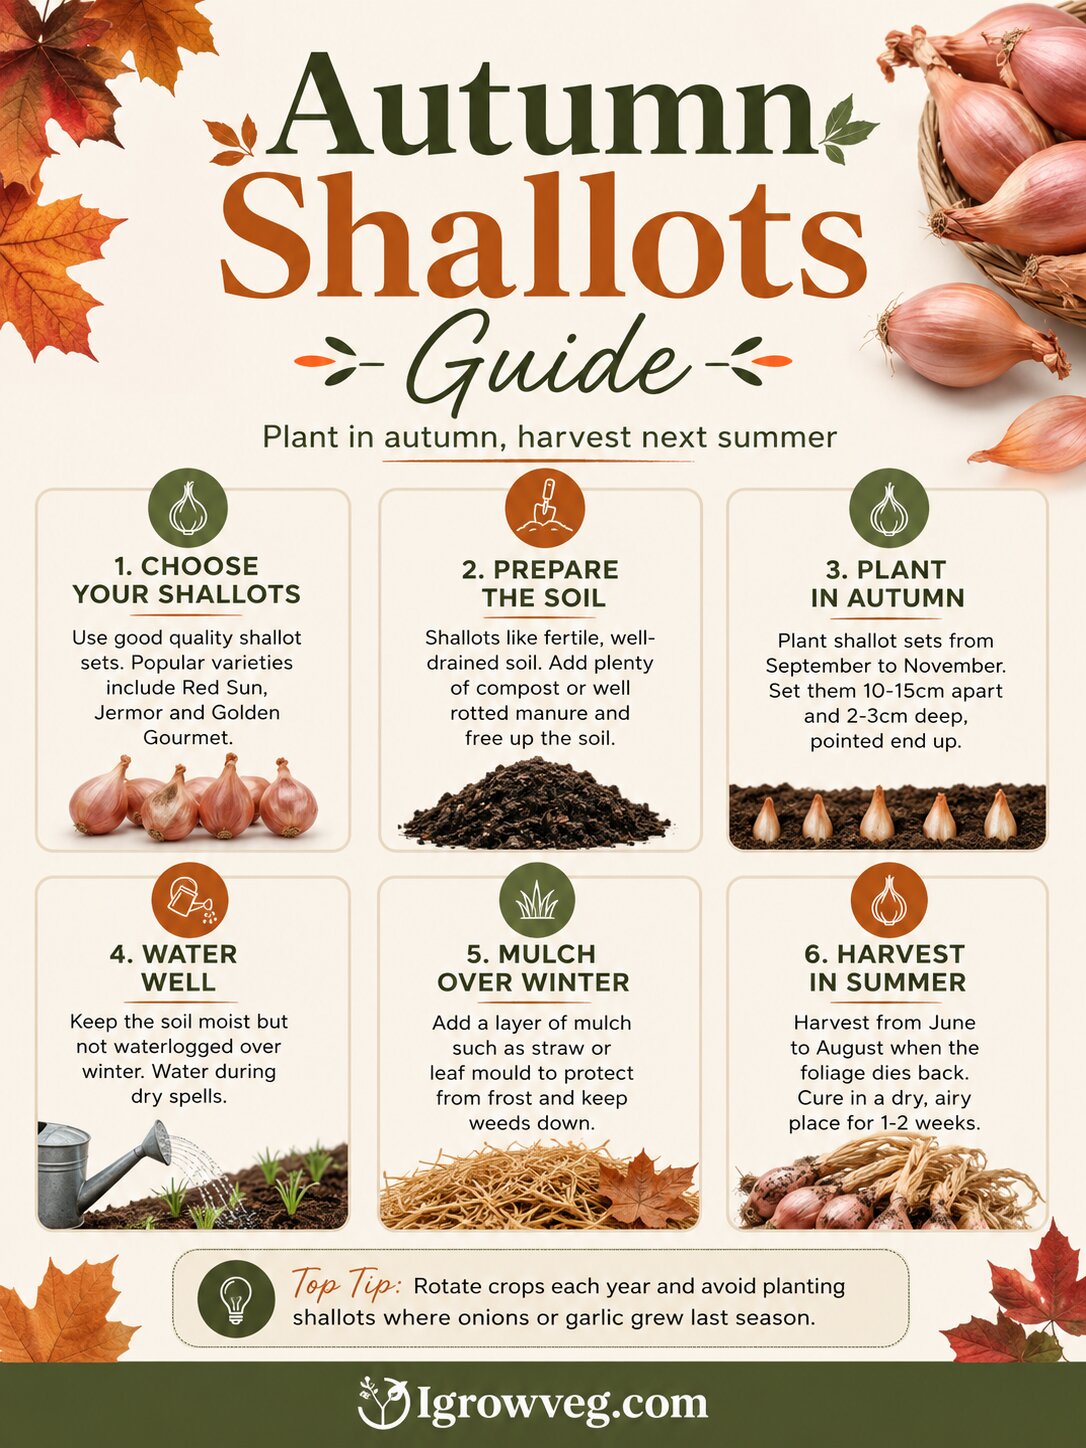
5. The Planting Process
The traditional adage for shallots is: “Plant on the shortest day, harvest on the longest day.” However, modern gardening wisdom suggests planting 4–6 weeks before the first hard frost is more effective for root establishment.
Step-by-Step Planting:
- Clear the Area: Ensure the bed is free of perennial weeds. Shallots hate competition.
- Separate the Clusters: If you bought your sets in clusters, gently break them apart into individual bulbs.
- Spacing: Space sets 15–20cm (6–8 inches) apart, with 30cm (12 inches) between rows. This gives the clusters ample room to expand without touching, which reduces the risk of fungal spread.
- Depth: This is critical. Do not bury shallots deeply. Push the bulb into the soil so only the very tip (the “nose”) is visible at the surface.
- Firming: Gently firm the soil around the bulb to ensure good contact with the roots and to prevent birds from pulling them out.
Pro Tip: Birds (especially pigeons) love to pull up newly planted shallot sets, thinking the tips are worms. Covering the area with a temporary horticultural fleece or netting until the roots take hold can save your crop.
6. Winter Care and Maintenance
Once the sets are in the ground, they require very little attention during the dormant months.
- Mulching: In extremely cold climates, a light layer of straw or leaf mold can protect the bulbs from “frost heave”—a process where the soil freezes and thaws, physically pushing the bulbs out of the ground.
- Weeding: This is the most important task. Shallots have shallow root systems and do not compete well with weeds. Hand-weed regularly to avoid damaging the bulbs with a hoe.
- Watering: Generally, autumn and winter rainfall provide enough moisture. You only need to water if the soil becomes bone-dry during a freakish dry spell.
7. Spring Growth and Feeding
As the days lengthen and the soil warms (typically March or April), you will see a flush of green growth.
- The Nitrogen Boost: Once active growth begins, apply a light dressing of a balanced organic fertilizer or a high-potash liquid feed. This encourages the leaves to grow large, which in turn fuels the development of the bulb cluster.
- Removing Mulch: If you used heavy mulch for winter protection, peel it back in spring to allow the soil to warm up and to prevent moisture from sitting against the neck of the bulb.
- Watering: As the bulbs begin to swell in late spring/early summer, keep the plants well-watered. Dry soil at this stage will result in smaller bulbs.
8. Troubleshooting: Pests and Diseases
Shallots are generally hardier than onions, but they are susceptible to a few specific issues.
Allium Leaf Miner
A relatively new pest in many regions. The small fly lays eggs in the leaves, and the larvae tunnel down into the bulb, causing rot.
- Solution: The only effective organic defense is covering the crop with a fine insect-proof mesh (0.6mm) from the moment of planting.
Downy Mildew
A fungal disease that appears as a greyish-purple fuzz on the leaves during damp, warm springs.
- Solution: Ensure wide spacing for airflow and avoid overhead watering.
Neck Rot
This usually occurs during storage but starts in the field. It is caused by excess moisture or nitrogen late in the season.
- Solution: Stop watering the plants once the bulbs have swollen and the leaves begin to turn yellow.
9. Harvesting and Curing
Harvesting is all about timing. If you lift them too early, the bulbs won’t store well; too late, and they may begin to sprout or rot in the ground.
Signs of Readiness
In mid-to-late summer, the foliage will naturally begin to yellow and “topple over.” This is the signal that the plant has stopped diverting energy to the leaves and is focusing entirely on the bulbs.
The Lifting Process
- Ease them up: Use a garden fork to gently lift the entire cluster from beneath. Do not pull them by the leaves, as the necks are fragile.
- Separate (Carefully): Gently break the clusters apart into individual shallots.
- Drying (Curing): If the weather is dry, leave the bulbs on the surface of the soil for 2–3 days to dry in the sun. If rain is forecast, move them to a well-ventilated, dry spot like a shed, greenhouse (shaded), or garage.
10. Storage Secrets
A well-cured shallot can last anywhere from 6 to 12 months, making them a true staple of the winter larder.
- The “Crunch” Test: Shallots are ready for storage when the outer skins are papery and the roots are brittle and dry.
- Environment: Store in a cool, dark, and dry place. Aim for a temperature of 10–15°C (50–60°F). Avoid refrigerators, as the humidity is too high and will trigger sprouting.
- Containers: Use mesh bags, wire baskets, or even old tights. Airflow is essential. Never store them in plastic bags.
Culinary Profile: Why Chefs Love Them
Shallots are chemically different from onions. They contain more phenols, more flavonoids, and more sugar. When slowly sautéed in butter, they undergo a complex caramelization process that onions simply cannot replicate.
- Raw: Finely minced in a mignonette for oysters or a vinaigrette.
- Crispy: Thinly sliced and deep-fried as a garnish for Asian dishes.
- Roasted: Whole bulbs roasted in their skins become creamy and sweet, perfect alongside roasted meats.
Quick Reference Table
| Factor | Best Practice |
|---|---|
| Planting Time | Oct–Nov |
| Spacing | 15–20 cm bulbs, 30 cm rows |
| Soil pH | 6.5–7.5 |
| Watering | Light in winter, regular in spring |
| Harvest | June–July |
| Storage | 0–5°C, dry, ventilated |
Conclusion: The Cycle Completes
Growing autumn shallots is a lesson in patience and the rewards of working with the seasons. By placing these small, unassuming bulbs into the cooling earth of autumn, you are participating in a centuries-old agricultural tradition. When you lift those golden, heavy clusters in the height of the following summer, you’ll realize that the minimal effort required during the winter months has paid off in a harvest that is as beautiful as it is delicious.
FAQs on Autumn Shallots
Q1: Can I plant supermarket shallots? Not recommended—may carry disease or be treated to prevent sprouting. Use certified sets.
Q2: Do shallots need full sun? Yes, they thrive in sunny, open positions.
Q3: Can I grow shallots in containers? Yes, use deep pots with good drainage.
Q4: Why are my shallots small? Caused by poor soil, overcrowding, or insufficient watering during spring growth.
Q5: How do I prevent bolting? Plant at the correct time (autumn) and avoid stress from drought or poor soil.
Q6: Can shallots survive frost? Yes, autumn varieties are bred for cold tolerance.
Q7: How many shallots do I get from one bulb? Typically 6–10 bulbs per planted set.