Understanding the ranunculus growth stages is the key to successfully cultivating these popular, rose-like flowers. Known botanically as Ranunculus asiaticus, they are cool-season perennials that grow from unique, claw-like underground structures called corms. Unlike many common garden flowers, ranunculus have a specific “biological clock” that requires cool night temperatures and bright days.
By recognizing each phase of their development, gardeners can provide the right amount of water and light at the precisely the right moment. This guide breaks down the transformation from a dormant “claw” to a vibrant, multi-petaled masterpiece.
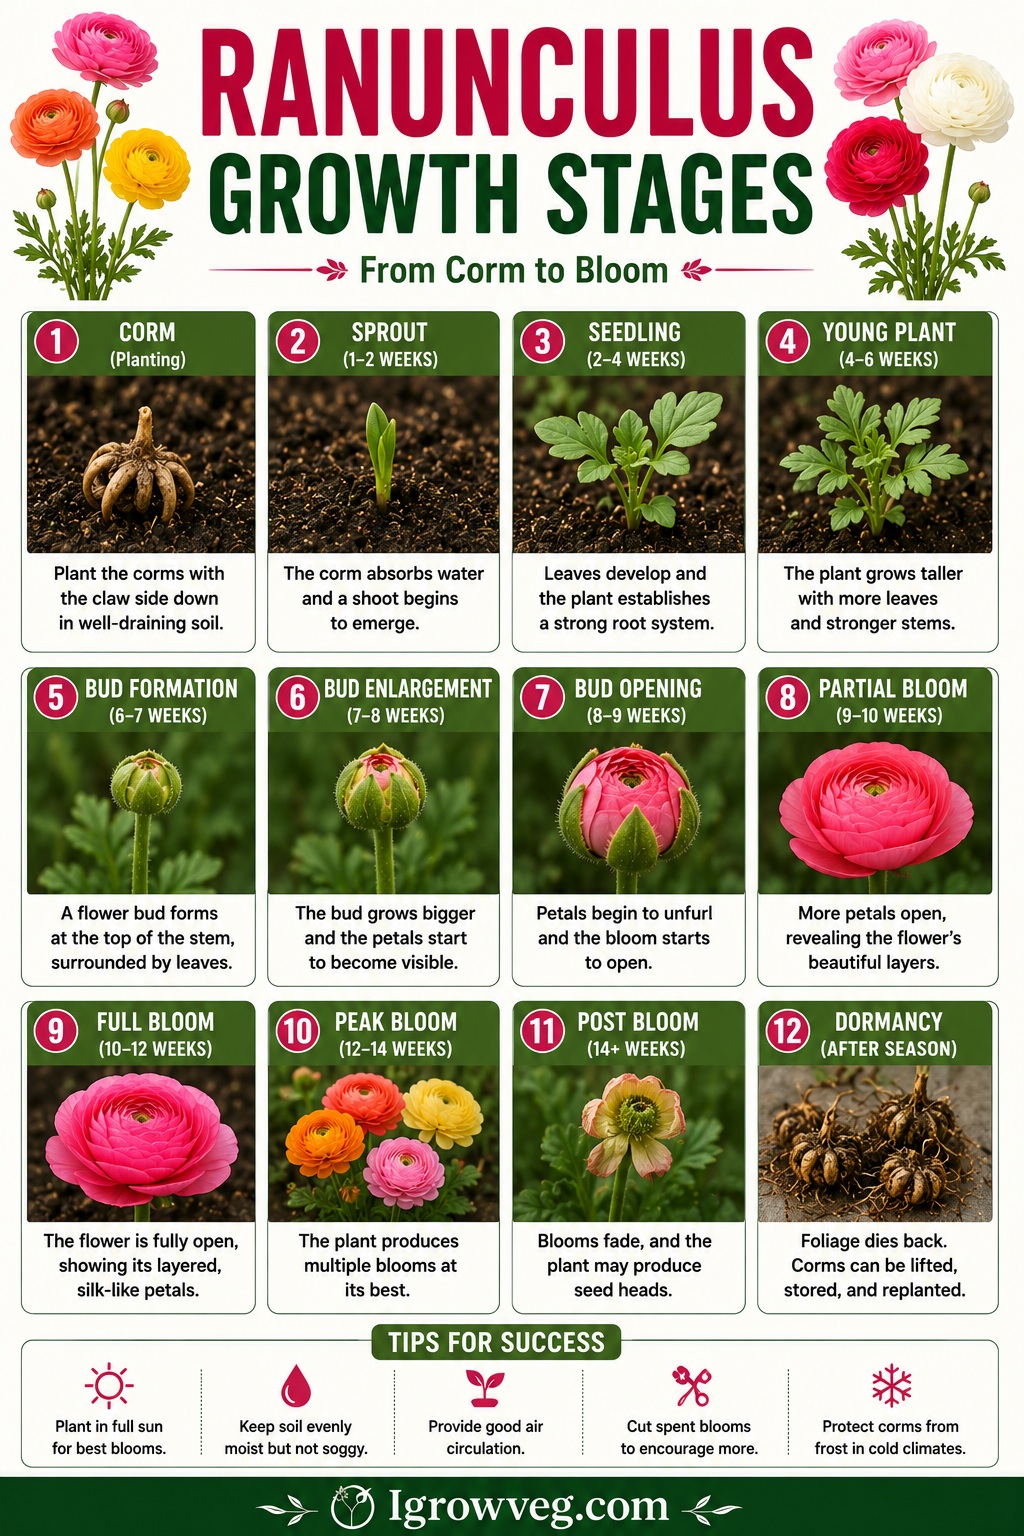
Stage 1: The Dormant Corm and “Pre-Sprouting”
The lifecycle begins with the corm, which resembles a small, dehydrated bunch of bananas or a bird’s claw. In its dormant state, it is hard and dry.
- The Awakening: Many professional growers start with “pre-sprouting.” By soaking the corms in room-temperature water for 3 to 4 hours, the corms “plump up” and double in size.
- Initial Rooting: Once soaked, they are placed in a tray of moist starting mix in a cool, dark place. Within 10–14 days, tiny white root hairs begin to emerge from the “claw” ends. This is the foundation stage that dictates the future strength of the plant.
Stage 2: Emergence and Vegetative Growth
Once planted in their permanent location—whether in a garden bed or a deep container—the ranunculus enters its vegetative phase.
- The First Shoots: Within 2 to 3 weeks of planting, the first bright green shoots break the soil surface. The foliage is parsley-like, with deeply lobed, feathery leaves.
- Leaf Expansion: During this stage, the plant focuses entirely on building a lush rosette of foliage. It is critical to keep the soil moist but not soggy, as the young corms are susceptible to rot. For detailed anatomical diagrams of Ranunculus leaf structures, The Missouri Botanical Garden is an excellent botanical resource.
Stage 3: The “Budding” or Bolting Phase
As the days lengthen and the weather remains cool (ideally between 45°F and 65°F), the plant begins to “bolt.”
- Stem Development: A central flower stalk rises from the center of the leafy rosette. Each plant can produce multiple stalks, especially if the corms are large (often referred to as “jumbo” grade).
- The Tight Bud: At the tip of each stalk, a small, hard, green bud appears. It looks similar to a green marble. At this stage, the plant increases its demand for nutrients, particularly potassium, to support the coming blooms.
Stage 4: The Bloom and “Show” Stage
This is the pinnacle of the ranunculus growth stages.
- Color Showing: The green sepals begin to peel back, revealing the tightly packed, paper-thin petals. Ranunculus are famous for their high petal count, often looking like a cross between a peony and a rose.
- Full Opening: The flower will continue to expand over several days. For the longest vase life, florists often harvest them at the “marshmallow stage”—when the bud is colored and soft to the touch but not yet fully open. To learn about commercial harvesting standards, the University of California Agriculture and Natural Resources (UC ANR) provides professional floriculture data.
Stage 5: Senescence and Dormancy
After the glory of the bloom, the plant begins its final phase.
- Fading and Seed Set: If not deadheaded, the flower will fade, and the center will swell with seeds. However, most gardeners remove faded flowers to encourage the plant to put energy back into the corm.
- Yellowing Foliage: As temperatures rise above 75-80°F, the ranunculus will naturally begin to yellow and die back. This is a crucial signal that the plant is entering dormancy.
- The Return to Rest: Once the foliage is completely brown and dry, the corm can be lifted from the soil, dried, and stored in a cool, dark place until the next planting season. For storage techniques for summer-dormant bulbs, The Old Farmer’s Almanac offers comprehensive guides.
Top Ranunculus Companion Plants
The best companions for ranunculus share their love for cool temperatures and well-drained soil. They should complement the “cabbage-rose” shape of the ranunculus without overshadowing it.
Spring Bulbs (Tulips and Narcissus)
Ranunculus and spring bulbs are a classic pairing. Tulips offer a similar “cup” shape but with a smoother texture, while Narcissus (daffodils) provide a contrasting trumpet shape. Planting white ranunculus alongside soft yellow daffodils creates a fresh, “spring awakening” aesthetic. For botanical insights into bulb-layering techniques, The Royal Horticultural Society offers excellent perennial design guides.
Anemones
Often sold alongside ranunculus corms, Anemone coronaria (Poppy Anemone) is the perfect biological partner. They share identical planting times, soil requirements, and bloom windows. The dark, striking centers of anemones provide a beautiful “moody” contrast to the bright, ruffled layers of the ranunculus.
Pansies and Violas
For a lush, layered look, use pansies or violas as a “living mulch” around the base of your ranunculus. These low-growing flowers thrive in the same cool weather and help keep the soil surface cool, which ranunculus roots love. They also fill in the gaps between the upright ranunculus stems, creating a full, professional-looking garden bed.
Sweet Alyssum
Sweet Alyssum acts as a delicate, fragrant carpet. Its tiny white or purple flowers offer a “frothy” texture that softens the bold, architectural look of ranunculus. It also attracts early-season pollinators to your garden. For expert advice on pollinator-friendly garden design, The Missouri Botanical Garden is a gold-standard resource.
Growing Ranunculus in Pots: The Key to Success
Growing ranunculus in pots is often more successful than in-ground planting because it allows for total control over drainage and the ability to move the plants to follow the sun or escape a late-season freeze.
Choosing the Right Container
Ranunculus corms need space for their “claw-like” root systems. Choose a pot that is at least 8–10 inches deep. Ensure the container has ample drainage holes; ranunculus are highly susceptible to root rot if they sit in stagnant water.
The Ideal Potting Mix
Standard garden soil is too heavy for containers. Use a high-quality, peat-based or coco-coir-based potting mix amended with perlite or coarse sand. This ensures that water moves through the pot quickly while still retaining enough moisture to keep the plant hydrated.
Planting and Spacing
When growing ranunculus in pots, you can plant the corms slightly closer together than you would in the ground for a “bouquet” effect. Space them 3–4 inches apart and plant them about 2 inches deep with the “claws” facing downward.
Sunlight and Temperature
Place your pots in a location that receives at least 6 hours of direct sunlight. However, because pots can heat up faster than the ground, keep an eye on the temperature. If a heatwave hits (above 75°F), move the pots to a cooler, slightly shaded spot to extend the bloom life. For temperature-specific care instructions, The Old Farmer’s Almanac provides detailed regional planting calendars.
Summary Table of Ranunculus Development
| Growth Stage | Timing (Approx.) | Primary Care Need |
| Dormancy/Soaking | Day 1 | Oxygenated water soak. |
| Pre-Sprouting | Weeks 1-2 | Cool (50°F) and dark environment. |
| Emergence | Weeks 3-5 | Bright light; consistent moisture. |
| Bolting | Weeks 8-12 | Organic fertilizer high in potassium. |
| Blooming | Weeks 12-15 | Regular deadheading for more buds. |
| Dormancy | Post-Bloom | Stop watering once leaves yellow. |
Conclusion
Understanding the ranunculus growth stages allows you to work with the plant’s natural rhythm rather than against it. From the initial “plumping” of the dormant corm to the final yellowing of the leaves, each phase requires specific attention to temperature and moisture. By providing a cool start and a sunny, well-drained finish, you can transform these strange-looking “claws” into one of the most breathtaking displays in the spring garden.
FAQ: Frequently Asked Questions
1. Can I grow ranunculus in hot climates?
Yes, but they must be planted in the fall or very early winter so they can bloom before the heat of summer sets in. They will go dormant as soon as it gets hot.
2. Why did my ranunculus corms rot in the ground?
This usually happens due to overwatering or poor drainage. Ranunculus need soil that drains quickly; “wet feet” is the most common cause of failure.
3. Do I have to soak the corms before planting?
You don’t have to, but it significantly speeds up the process and ensures a higher success rate by “waking up” the corm.
4. How many flowers does one corm produce?
A high-quality, large corm can produce anywhere from 5 to 10 flowers over a season if the weather stays cool.
5. Should I grow ranunculus in sun or shade?
They need full sun (at least 6 hours) to produce strong stems and vibrant colors, but they prefer their roots to stay cool. Mulching can help with this.